[66호]20대 주거환경을 위한 외·내부 환기 제어 시스템
2020 ICT 융합 프로젝트 공모전 장려상
20대 주거환경을 위한 외·내부 환기 제어 시스템
글 | 항공대학교 이종민
1. 심사평
칩센 우선 보고서를 통하여 작품에 대하여 조금 더 설명해주었으면 좋았겠다는 생각은 들지만, 주제로 삼은 작품명의 “20대 주거 환경을 위한~”으로 시작하는 부분이 매우 인상적입니다. 공기 청정이 필요한 이유를 단순히 외부에서 발현한 공기질의 저하가 아닌, 20대가 사는 주거환경에서는 왠지 실내의 공기질이 더 나쁠 수도 있겠다는 생각이 들었습니다. 작품명을 아주 잘 정하신거 같습니다. 그리고 다른 유사 작품들과의 차이점, 두 개의 장치(실내/외)가 서로 통신하여 연동하도록 한 부분은 매우 기발한 발상으로 보입니다. 스마트폰 또는 인터넷을 통해 추출된 지역의 정보보다는 실제로 필요한 것은 내가 머무르고 있는 실내 공간과 외부 공간의 공기질의 차이가 더 중요하다는 생각이 들기 때문입니다. 전반적으로 데모 작품이 구성이나 제작이 매우 깔끔하게 된 듯 합니다.
펌테크 실생활과 접목된 실용성을 지닌 작품으로 생각됩니다. 전체적으로 꼼꼼하게 잘 기획되었고, 간결하게 잘 구성한 완성도 높은 작품이라고 생각합니다.
위드로봇 아이디어가 좀 더 추가되면 좋은 작품이 될 것 같습니다.
2. 배경
미세먼지 농도가 심각하다는 것은 아마 우리 모두가 알고 있을 것이다. 그리고 실제로 미세먼지로 인한 두통, 기침, 폐암, 그리고 직업 능률 감소로까지 이어지고 있다. 네이버 키워드 검색량을 확인해보면 미세먼지라는 것이 큰 문제이고 많은 사람들이 관심을 가지고 있다는 것을 확인할 수 있다.
2.1. 현재상황
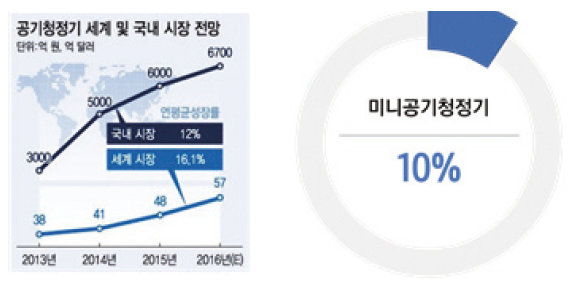
미세먼지 문제를 해결하기위한 공기기청정기는 2018년 기준으로 2조원 시장을 가지고 있고 미니 공기청정기 시장은 약 1000억원의 시장을 형성하고 있다. 하지만 미니 공기청정기는 단지 필터와 펜으로 이루어진 공기청정기로 사람들이 어느정도 공기가 오염되었는지 확인할 수 없다. 또한 미니 공기청정기를 분해해보면 공기청정기의 필터가 역할을 제대로 하지 못하고 펜이 약한 경우가 대부분이다. 배경에서 말했듯이 대부분의 사람들은 초미세먼지로 인해 창문을 열고 살지 않고 있다 하지만 기사에 따르면 집안의 먼지농도와 밖의 미세먼지 농도를 비교 했을 때 밖의 미세먼지 농도가 높다고 한다. 이러한 상황에는 공기청정기를 계속 틀기보다 창문을 여는 것이 더 효과적인 방법이 될 수 있다. 그래서 저는 이 두가지 문제점을 해결하기 위한 제품을 만들려고 했다.
2.2. 제품의 특징
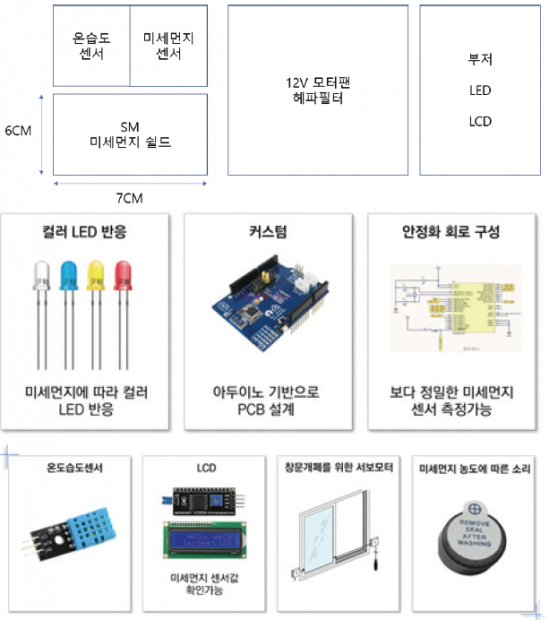
집안의 미세먼지 농도를 확인할 수 있고 내부의 미세먼지가 외부보다 높은 경우 자동으로 창문을 열 수 있는 시스템을 만들었다. 그렇게 함으로써 20대의 주거환경에 필수적인 공기 오염도를 현저히 줄일 수 있고 전기료 감소로 인한 경제적 이익을 취할 수 있다고 생각한다.
2.3. 제품 상세 특징 및 스펙
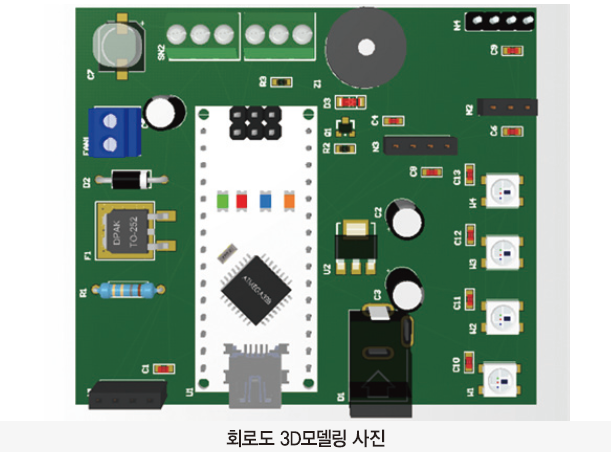
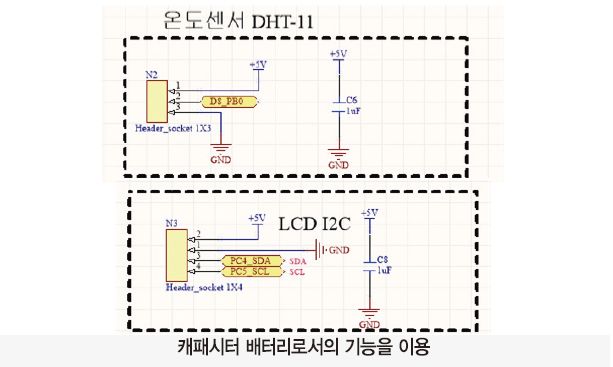
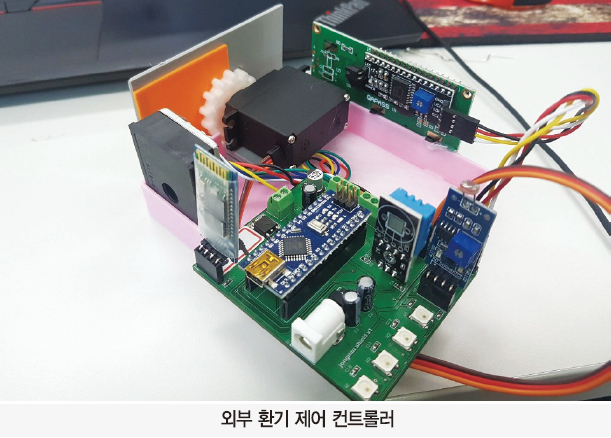
아두이노 나노 기반인 PCB를 제작하려고 한다. 이 공기청정기는 여러가지 특징이 있다. 브레드 보드를 사용하지 않고 PCB 형태로 제작 되기 때문에 회로가 안정화되어 있고 LED, 미세먼지, 온습도 센서를 통한 정보를 LCD에서 바로 확인을 할 수 있다.
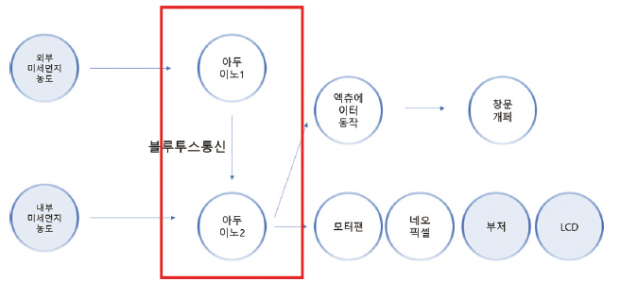
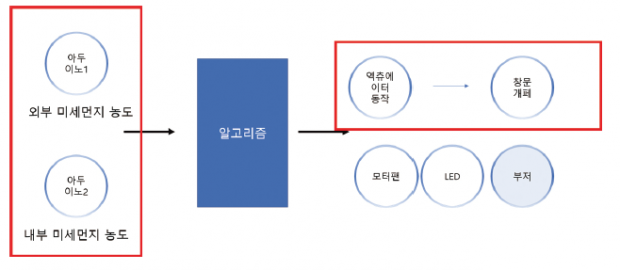
또한 다양한 센서 정보를 다른 쪽 아두이노에 블루투스 통신을 통해서 정보를 보내 내부와 외부의 미세먼지 농도를 비교하여 창문 개폐를 위한 서브모터를 작동시킨다.
2.4. 제품 작동 알고리즘
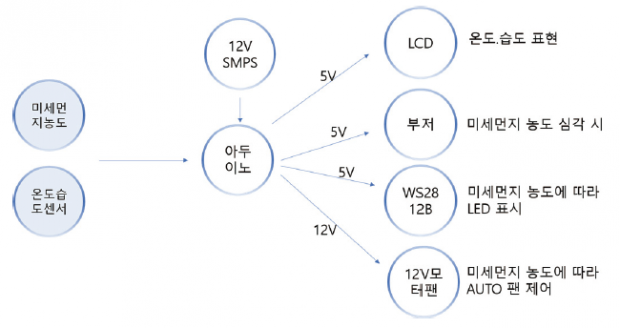
미세먼지에 따른 LED표시, 미세먼지에 농도에 따라 AUTO 펜 제어, 그리고 미세먼지 농도 심각 시 부저가 울리는 것이다. 그리고 그러한 정보를 LCD에 표현하는 것이다.
외부장치와 내부장치를 구성하여, HC-06 두개를 페어링하여 외부 미세먼지 농도에 대한 정보를 아두이노에 블루투스 통신을 통해서 보내 창문을 개폐여부를 결정하는 것이다.
블루투스 통신의 경우 일련의 String 형식으로 값이 전달이 된다. 따라서 여러가지 정보를 보내기가 매우 어려운 사항이다. 따라서 이번 프로젝트에서는 미세먼지 농도를 포함해서, 온도, 습도, 조도의 정보를 블루투스 통신을 통해서 받아야하기 때문에 센서값별로 일련의 String을 파싱하는 소프트웨어 알고리즘이 필요하다. 그 부분을 코딩으로 구현
미세먼지 센서의 값은 정확한 농도를 표현을 하는 것이 아닌 전압을 읽어서 가져오는 것이다. 시리얼 통신을 통해 고정밀 미세저측정기를 통해서, 캘리브레이션 할 수 있는 이동평균 개념을 적용해서 센서값 기복에 대한 부분을 해결했다.
2.5. 회로도 및 부분별 하드웨어 원리
캐패시터는 다양한 용도로 사용된다. 노이즈를 막기위해서 맥류신호를 평활하기 위한 평활용으로 사용되었다.
전원 순단 시 및 IC의 구동 스피드가 급격히 빨라짐에 따라, 부하전류가 증가한 경우, 전원으로부터의 라인 전압이 강하하여, IC의 오동작을 초래하는 경우가 있다. 이를 방지하기 위해, 전원 라인 정상 시에 콘덴서가 축적해 놓은 전기를 IC 측에 공급하여 전원 라인 전압을 일시적으로 유지한다.
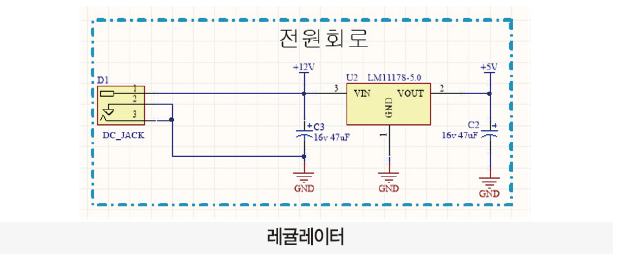
아두이노에 전원을 공급하기위해서는 5v전원을 공급해주어야한다. 하지만 모터의 경우 5v를 공급하게 되면 최대 파워를 낼 수 가 없다 그래서 12v전원은 모터에 아두이노에는 전압을 강압시켜 5v를 공급 시켜주기 위해 레귤레이터를 사용하였다. 전원 공급의 경우 12v로 일정한 정전압을 보내므로 스위칭 레귤레이터가 아닌 리니어 레귤레이터를 사용하였다.
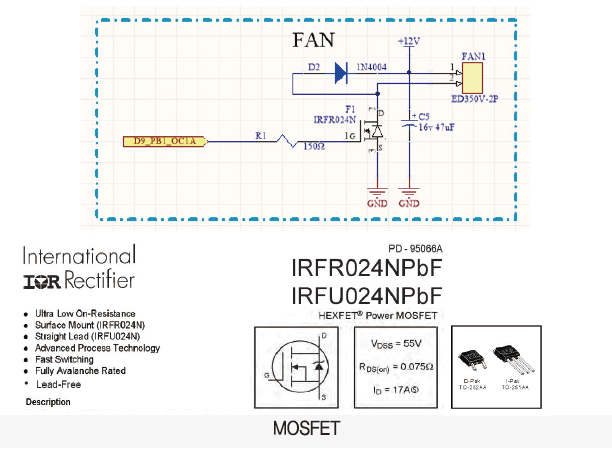
12v와 0.7A가 사용되는 모턴팬을 동작시키기 위해 Mosfet을 사용하여, 아두이노 신호에 따라 입력된 12V 전원부에서 전류를 공급할 수 있도록 구성을 하였다
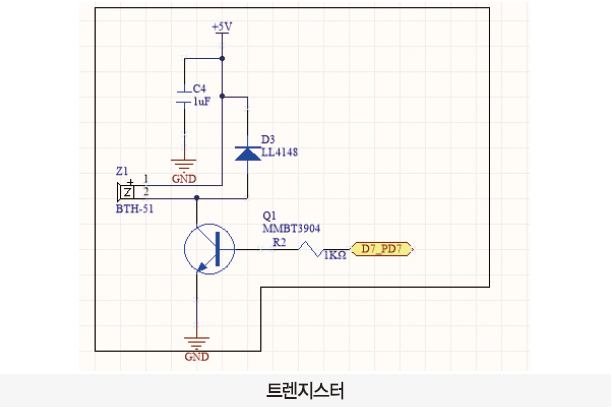
경고음을 알리기 위한 용도로서 부저를 사용하였다. 부저 또한 코일성분을 가지고 있기에 직접적으로 아두이노에 연결을 하는 것은 좋지 않으며, 아두이노에서 출력하는 전류의 한계로 소리가 매우 작은 측면을 가지고 있다. 따라서 부저의 경우에는 트랜지스터를 사용하여 전류증폭을 통해 더 큰 경고음을 울릴 수 있도록 회로를 구성하였으며, 다이오드(FLYING WEEL 다이오드)를 사용하여, 역기전력를 방지하고자 구성하였다.
3. 최종 결과물
4.아두이노 소스코드
// 해당 소스코드는 외부데이터(미세먼지 / 온도 / 습도 / 조도) 측정하고, 내부 데이터와 비교하여
// 외부환기에 대한 부분을 담당하는 부분이다.
#include “SoftwareSerial.h”
#include <Adafruit_NeoPixel.h>
#include “DHT.h”
#include <Servo.h>
#include <LiquidCrystal_I2C.h>
// 블루통신 관련해서 필요한 변수 정리
const int maxIndex = 10;
byte blockData[maxIndex]; //block 값 저장
int arrIndex = 0; // 배열 arrIndex
byte refined_humidity = 0;
byte refined_temperature = 0;
byte refined_value = 0;
byte refined_dust_data = 0;
byte refined_humidity2 = 0;
byte refined_temperature2 = 0;
byte refined_value2 = 0;
byte refined_dust_data2 = 0;
/*미세먼지센서 변수들*/
#define measurePin A1 //Connect dust sensor to Arduino A0 pin
#define ledPower 6 //Connect 3 led driver pins of dust sensor to Arduino D4
#define SampleTime 30 //먼지센서 30회 샘플링
int samplingTime = 280;
int deltaTime = 40;
int sleepTime = 9680;
float voMeasured = 0;
float calcVoltage = 0;
float dustDensity = 0;
//조도센서——————————-
#define cds A0
//서보 모터 오브젝트 생성
Servo myservo;
// 온습도 센서를 디지털 4번 핀에 연결합니다.
#define DHTPIN 8
#define DHTTYPE DHT11
//네오픽셀 연결 핀
#define PIN1 4
//네오픽셀 LED개수
#define NUMPIXELS 4
Adafruit_NeoPixel pixels1 = Adafruit_NeoPixel(NUMPIXELS, PIN1, NEO_GRB + NEO_KHZ800);
int delayval = 10;
DHT dht(DHTPIN, DHTTYPE);
SoftwareSerial Serial1(2, 3); // rx,tx
// 서보모터 변수
int val1 = 0;
int val2 = 0;
// LCD의 경우, 고유 주소를 가지고 있는데 대부분의 LCD는 2개의 주소 중 하나로 세팅되어 있다.
// 0x3F, 0×27 이렇게 두가지 주소가 있다.
LiquidCrystal_I2C lcd(0×27, 16, 2);
//—————————————
void GetData();
void get_data_print2();
void data_print1();
void LED_R1();
void LED_B1();
void LED_G1();
void window_open_close(int out, int in);
int dust_val(); // 먼지 값받아오는 함수
void setup () {
// 시리얼통신
Serial.begin(9600);
// 블루투스 통신
Serial1.begin(9600);
//서보 모터 10번핀
myservo.attach(10);
myservo.write(100);
// 조도센서
pinMode(cds, INPUT);
// 미세먼지센서
pinMode(ledPower, OUTPUT);
pinMode(measurePin, INPUT);
//온도습도센서 시작
dht.begin();
// 네오픽셀 시작
pixels1.begin(); // This initializes the NeoPixel library.
lcd.init();
lcd.backlight();
lcd.clear();
}
void loop () {
// 블루투스 통신을 통해 내부데이터를 받아서 파싱을 하고, 각 변수에 저장
if (Serial1.available()) {
GetData();
}
if (arrIndex != 0 && arrIndex < 9) {
Serial.println(“내부데이터 변수 저장”);
if (blockData[0] == 104)
refined_humidity2 = blockData[1];
if (blockData[2] == 116)
refined_temperature2 = blockData[3];
if (blockData[4] == 99)
refined_value2 = blockData[5];
if (blockData[6] == 100)
refined_dust_data2 = blockData[7];
} else {
Serial.println(“내부데이터 변수 이상으로 미저장 or 블루투스 미연결—–”);
}
// 습도와 온도값을 측정하고, 제대로 측정되었는지 확인해줍니다.
byte humidity = dht.readHumidity();
byte temperature = dht.readTemperature();
refined_humidity = constrain(humidity, 0, 100);
refined_temperature = constrain(temperature, 0, 100);
// 조도센서 값
int value = analogRead(cds);
refined_value = map(value, 0, 1023, 100, 0);
// 먼지센서 값
int dust_data = dust_val(); // 먼지량을 받아옴
refined_dust_data = map(dust_data, 0, 1023, 0, 100);
// 미세먼지 농도에 따라 색변화와 부저를 활용하여 경고음 제공하기.
if (refined_dust_data > 65) {
delay(10);
LED_R1();
} else if (refined_dust_data <= 65 && refined_dust_data > 50 ) {
delay(10);
LED_RB1();
} else if (refined_dust_data <= 50 && refined_dust_data > 25) {
delay(10);
LED_B1();
} else {
LED_G1();
}
// 내부데이터와 외부데이터를 비교하여, 창문개폐 진행
// 내부 공기청정기팬의 경우에는 외부,내부 미세먼지 농도에 상관없이, 내부 미세먼지가 25 이상인 경우에는 자동으로 작동이된다.
// 창문개폐의 경우는
// 1) 외부 창문이 열리는 경우
// 외부의 미세먼지농도가 내부보다 낮을 때,
// 외부 미세먼지 농도가 높은 경우에는 창문을 열리지 않고, 내부 팬에 의해서 공기정화가 진행이 된다.
// 내부 미세먼지 농도가 25 이상일 때, 동작한다.
window_open_close(refined_dust_data, refined_dust_data2);
lcd.clear();
lcd.setCursor(0, 0);
lcd.print(“out dust :”);
lcd.print(refined_dust_data);
lcd.setCursor(0, 1);
if(refined_dust_data2 ==0){
lcd.print(“BT disconnected”);
}else{
lcd.print(“inner dust :”);
lcd.print(refined_dust_data2);
}
get_data_print2();
data_print1();
}
//—————————————
void LED_R1() {
for (int i = 0; i < NUMPIXELS; i++) {
pixels1.setPixelColor(i, pixels1.Color(255, 0, 0)); // Moderately bright green color.
pixels1.show(); // This sends the updated pixel color to the hardware.
delay(delayval); // Delay for a period of time (in milliseconds).
}
}
void LED_G1() {
for (int i = 0; i < NUMPIXELS; i++) {
pixels1.setPixelColor(i, pixels1.Color(0, 255, 0)); // Moderately bright green color.
pixels1.show(); // This sends the updated pixel color to the hardware.
delay(delayval); // Delay for a period of time (in milliseconds).
}
}
void LED_B1() {
for (int i = 0; i < NUMPIXELS; i++) {
pixels1.setPixelColor(i, pixels1.Color(0, 0, 255)); // Moderately bright green color.
pixels1.show(); // This sends the updated pixel color to the hardware.
delay(delayval); // Delay for a period of time (in milliseconds).
}
}
void LED_RB1() {
for (int i = 0; i < NUMPIXELS; i++) {
pixels1.setPixelColor(i, pixels1.Color(255, 0, 120)); // Moderately bright green color.
pixels1.show(); // This sends the updated pixel color to the hardware.
delay(delayval); // Delay for a period of time (in milliseconds).
}
}
//—————————————
int dust_val() //센서의 노이즈 값으로인해 여러번 데이터를 받은뒤 평균 먼지량을 구함
{
int dust = 0;
for (int i = 0; i < SampleTime; i++)
{
digitalWrite(ledPower, LOW); // power on the LED 0.028초부터 led가 가장 밝음으로 최소샘플링 타임으로 결정
delayMicroseconds(samplingTime);
voMeasured = analogRead(measurePin); // read the dust value
delayMicroseconds(deltaTime);
digitalWrite(ledPower, HIGH); // turn the LED off
delayMicroseconds(sleepTime);
//////////////////////////////////////////// dust vlaue 받아오기
calcVoltage = voMeasured * (5.0 / 1024.0);
dustDensity = calcVoltage / 0.005; //(0.17 * calcVoltage – 0.1) * 1000;
/////////////////////value 의 미세한 변화를 수식으로 먼지량으로 변환
if (dustDensity < 0) { // value 의 값이 마이너스일경우 오류 임으로 0을 대입
dustDensity = 0;
}
dust += dustDensity;
}
return (dust / SampleTime)+50; // 센싱한값의 평균을 return
}
void GetData() {
Serial.println();
Serial.println(“데이터 가져오기 시작 “);
char temp;
arrIndex = 0;
temp = (char)Serial1.read();
Serial.println(“”);
Serial.print(temp);
// 전송 시작 확인
// 블루투스 시작을 알리는 문자를 s로 설정 !!!
if (temp != ‘s’) {
while (temp != ‘e’ ) {
temp = (char)Serial1.read();
}
return;
}
String stringTemp;
while (true) {
// Serial.print(“arrIndex : “);
// Serial.println(arrIndex);
if (Serial1.available()) {
temp = (char)Serial1.read();
Serial.print(temp);
if (arrIndex > 10) {
// Serial.println(“내부데이터 변수 이상 ———-”);
break;
}
// ‘_’ 라는 문자를 통해 구분을 지어준다. 구분을 지어주는 표시라고 생각을 하면된다. ———–
if (temp != ‘_’) {
// ‘e’ 라는 문자가 나오게 되면 블루투스 통신이 끝났다는 의미이다.
if (temp == ‘e’) {
break;
}
if (isAlpha(temp)) { //temp라는 변수가 문자인지 확인을 한다.
blockData[arrIndex] = temp;
arrIndex++;
} else if (isDigit(temp)) { //temp라는 변수가 숫자인지 확인을 한다.
stringTemp += temp;
} else {
// 원하지 않는 데이터 값
Serial.println(“upload failed. error: not digit or alpha”);
arrIndex = 0;
return;
}
}
else if (temp == ‘_’) {
if (stringTemp == “”)
continue; // 아래의 것들을 건너뛴다.
blockData[arrIndex] = stringTemp.toInt();
//변수 초기화
stringTemp = “”;
arrIndex++;
}
}
}
Serial.println(“끝”);
Serial.println(“”);
delay(30);
}
// int out은 외부미세먼지농도, int in 내부미세먼지농도
void window_open_close(int out, int in) {
// 내부미세먼지농도가 낮아서 공기정화를 할 필요없는 경우
if(in < 3){
return;}
if (in < 25) {
Serial.println(“내부 공기가 매우 깨끗합니다.”);
val1 = 100;
if (val1 != val2) {
myservo.write(val1); // 창문이 닫힘.
val2 = val1;
delay(10);
}
return;
}
// 내부미세먼지농도가 안좋은 경우
else {
if (out < in) {
Serial.println(“환기를 위해 창문 open. “);
val1 = 0;
if (val1 != val2) {
myservo.write(val1); // 창문이 닫힘.
val2 = val1;
delay(10);
}
delay(10);
} else {
Serial.println(“외부 미세먼지 농도가 높아, 창문 close. “);
val1 = 100;
if (val1 != val2) {
myservo.write(val1); // 창문이 닫힘.
val2 = val1;
delay(10);
}
delay(10);
}
}
}
void data_print1() {
Serial.print(“외부센서데이터 : “);
Serial.print(“humidity : “);
Serial.print(refined_humidity);
Serial.print(” temp :”);
Serial.print(refined_temperature);
Serial.print(” cds : “);
Serial.print(refined_value);
Serial.print(” dust : “);
Serial.println(refined_dust_data);
delay(300);
}
void get_data_print2() {
Serial.print(“내부센서데이터 : “);
Serial.print(“humidity : “);
Serial.print(refined_humidity2);
Serial.print(” temp :”);
Serial.print(refined_temperature2);
Serial.print(” cds : “);
Serial.print(refined_value2);
Serial.print(” dust : “);
Serial.println(refined_dust_data2);
delay(300);
아두이노 코드 2 – 내부 담당 코드
#include “SoftwareSerial.h”
#include <Adafruit_NeoPixel.h>
#include “DHT.h”
// I2C LCD를 쉽게 제어하기 위한 라이브러리를 추가해줍니다.
#include <LiquidCrystal_I2C.h>
/*미세먼지센서 변수들*/
#define measurePin A1 //Connect dust sensor to Arduino A0 pin
#define ledPower 6 //Connect 3 led driver pins of dust sensor to Arduino D4
#define SampleTime 30 //먼지센서 30회 샘플링
int samplingTime = 280;
int deltaTime = 40;
int sleepTime = 9680;
float voMeasured = 0;
float calcVoltage = 0;
float dustDensity = 0;
// 정제된 변수값
byte refined_humidity = 0;
byte refined_temperature = 0;
byte refined_value = 0;
byte refined_dust_data = 0;
//조도센서——————————–
#define cds A0
//부저 ———————————
#define buzzer 7
//모터팬 ——————————
#define fan 9
// 온습도 센서를 디지털 4번 핀에 연결합니다.
#define DHTPIN 8
#define DHTTYPE DHT11
//——————————-
//네오픽셀 연결 핀
#define PIN1 4
//네오픽셀 LED개수
#define NUMPIXELS 4
Adafruit_NeoPixel pixels1 = Adafruit_NeoPixel(NUMPIXELS, PIN1, NEO_GRB + NEO_KHZ800);
int delayval = 10;
int color_value=0;
DHT dht(DHTPIN, DHTTYPE);
SoftwareSerial Serial1(2, 3); // rx,tx
// LCD의 경우, 고유 주소를 가지고 있는데 대부분의 LCD는 2개의 주소 중 하나로 세팅되어 있다.
// 0x3F, 0×27 이렇게 두가지 주소가 있다.
LiquidCrystal_I2C lcd(0×27, 16, 2);
//—————————————-
void SendData();
void LED_RB1();
void setup () {
// 시리얼통신
Serial.begin(9600);
// 블루투스 통신
Serial1.begin(9600);
// 조도센서
pinMode(cds, INPUT);
// 미세먼지센서
pinMode(ledPower, OUTPUT);
pinMode(measurePin, INPUT);
//온도습도센서 시작
dht.begin();
// 12V 모터팬
pinMode(fan, OUTPUT);
// 네오픽셀 시작
pixels1.begin(); // This initializes the NeoPixel library.
// 부저 // #define buzzer 7
pinMode(buzzer, OUTPUT);
lcd.init();
lcd.backlight();
lcd.clear();
}
int dust_val(); // 먼지 값받아오는 함수
void loop () {
// 습도와 온도값을 측정하고, 제대로 측정되었는지 확인해줍니다.
byte humidity = dht.readHumidity();
byte temperature = dht.readTemperature();
refined_humidity = constrain(humidity, 0, 100);
refined_temperature = constrain(temperature, 0, 100);
// 조도센서 값
int value = analogRead(cds);
refined_value = map(value, 0, 1023, 100, 0);
color_value=map(refined_value, 10, 100, 0, 255);
// 먼지센서 값
int dust_data = dust_val(); // 먼지량을 받아옴
refined_dust_data = map(dust_data, 0, 1023, 0, 100);
Serial.print(” temp : “);
Serial.print(refined_temperature);
Serial.print(“‘c “);
Serial.print(” humidity : “);
Serial.print(refined_humidity);
Serial.print(“% “);
Serial.print(” cds : “);
Serial.print(refined_value);
Serial.print(” dust : “);
Serial.println(refined_dust_data);
lcd.clear();
lcd.setCursor(0, 0);
lcd.print(“hm:”);
lcd.print(refined_humidity);
lcd.print(” tp:”);
lcd.print(refined_temperature);
lcd.setCursor(0, 1);
lcd.print(“cds :”);
lcd.print(refined_value);
lcd.print(” dust :”);
lcd.print(refined_dust_data);
// 미세먼지 농도에 따라 색변화와 부저를 활용하여 경고음 제공하기.
if (refined_dust_data > 68) {
analogWrite(fan,150);
delay(10);
LED_R1();
tone(buzzer, 1000);
} else if (refined_dust_data <= 68 && refined_dust_data > 50 ) {
analogWrite(fan,150);
noTone(buzzer);
delay(10);
LED_RB1();
} else if (refined_dust_data <= 50 && refined_dust_data > 25) {
analogWrite(fan, 120);
noTone(buzzer);
delay(10);
LED_B1();
} else {
analogWrite(fan, 0);
noTone(buzzer);
LED_G1();
}
SendData();
}
//——————-
void LED_R1() {
for (int i = 0; i < NUMPIXELS; i++) {
pixels1.setPixelColor(i, pixels1.Color(color_value, 0, 0)); // Moderately bright green color.
pixels1.show(); // This sends the updated pixel color to the hardware.
delay(delayval); // Delay for a period of time (in milliseconds).
}
}
void LED_RB1() {
for (int i = 0; i < NUMPIXELS; i++) {
pixels1.setPixelColor(i, pixels1.Color(color_value, 0, color_value/2)); // Moderately bright green color.
pixels1.show(); // This sends the updated pixel color to the hardware.
delay(delayval); // Delay for a period of time (in milliseconds).
}
}
void LED_G1() {
for (int i = 0; i < NUMPIXELS; i++) {
pixels1.setPixelColor(i, pixels1.Color(0, color_value, 0)); // Moderately bright green color.
pixels1.show(); // This sends the updated pixel color to the hardware.
delay(delayval); // Delay for a period of time (in milliseconds).
}
}
void LED_B1() {
for (int i = 0; i < NUMPIXELS; i++) {
pixels1.setPixelColor(i, pixels1.Color(0, 0, color_value)); // Moderately bright green color.
pixels1.show(); // This sends the updated pixel color to the hardware.
delay(delayval); // Delay for a period of time (in milliseconds).
}
}
void rain_color1() {
for (int i = 0; i < NUMPIXELS; i++) {
int a = random(0, 255);
int b = random(0, 255);
int c = random(0, 255);
pixels1.setPixelColor(i, pixels1.Color(a, b, c)); // Moderately bright green color.
pixels1.show(); // This sends the updated pixel color to the hardware.
delay(delayval); // Delay for a period of time (in milliseconds).
}
}
//int dust_val() //센서의 노이즈 값으로인해 여러번 데이터를 받은뒤 평균 먼지량을 구함
{
int dust = 0;
for (int i = 0; i < SampleTime; i++)
{
digitalWrite(ledPower, LOW); // power on the LED 0.028초부터 led가 가장 밝음으로 최소샘플링 타임으로 결정
delayMicroseconds(samplingTime);
voMeasured = analogRead(measurePin); // read the dust value
delayMicroseconds(deltaTime);
digitalWrite(ledPower, HIGH); // turn the LED off
delayMicroseconds(sleepTime);
////////////////////////////////// dust vlaue 받아오기
calcVoltage = voMeasured * (5.0 / 1024.0);
dustDensity = calcVoltage / 0.005; //(0.17 * calcVoltage – 0.1) * 1000;
////////////value 의 미세한 변화를 수식으로 먼지량으로 변환
if (dustDensity < 0) { // value 의 값이 마이너스일경우 오류 임으로 0을 대입
dustDensity = 0;
}
dust += dustDensity;
}
return dust / SampleTime; // 센싱한값의 평균을 return
}
void SendData() {
Serial1.print(“s_”);
Serial1.print(“h_”);
Serial1.print(refined_humidity);
delay(3);
Serial1.print(“_t_”);
Serial1.print(refined_temperature);
delay(3);
Serial1.print(“_c_”);
Serial1.print(refined_value);
delay(3);
Serial1.print(“_d_”);
delay(3);
Serial1.print(“_e”);
delay(200);
}


