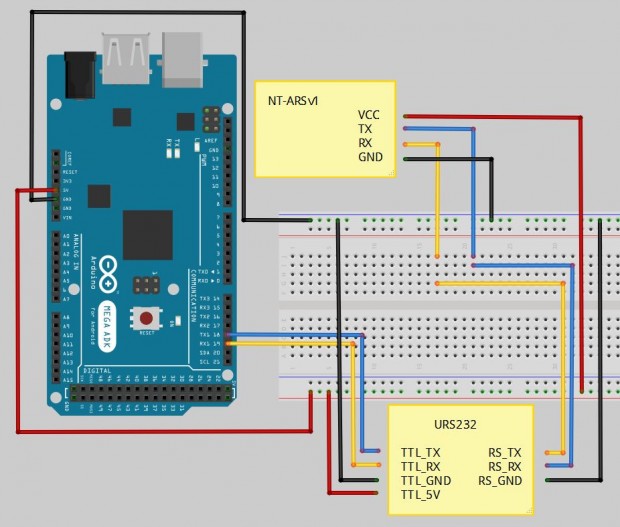
아두이노에서 NT-ARSv1의 데이터를 받는 예제
NT-ARSv1의 출력 데이터를 아두이노에서 해석하는 예제입니다. Roll, Pitch와 그 각속도 이렇게 4개의 값중에서 사용자가 선택할 수 있으며, 출력된 데이터는 문자열이 아니라 double형의 숫자로 받도록 했습니다. 이미 예전에 [바로가기]에서 NT-ARSv1의 데이터를 받는 부분을 다루었는데요. 당시에는 단순히 값을 한 번 확인하는 것과 아두이노와 ARS와의 연결에 대한 부분을 다루었다면 이번에는 약간 함수화를 했습니다. 기본적으로 하드웨어적인 연결은 [바로가기]와 같으니 먼저 읽고 넘어오시기 바랍니다.
일단 오늘 보여드릴 예제는 몇몇개의 함수로 구현되어 있어서 함수별로 하나씩 확인해보도록 하겠습니다.
|
1 2 3 4 5 6 7 8 9 10 11 12 13 14 |
String getARSresultAtOnece() { String outputValuesOfARS = ""; Serial1.print("<CAO>"); delay(2); while (Serial1.available()) { char incomingChar = Serial1.read(); outputValuesOfARS += incomingChar; } return outputValuesOfARS; } |
먼저 getARSresultAtOnce() 함수입니다. 이 함수는 NT-ARSv1의 데이터를 STRING의 형태로 저장하는 것이 목적입니다. 여러가지 형태로 다양하게 사용하실려면 이 함수만 사용하신 다음 간편하게 응용하시면 됩니다. 함수이름에도 나타나 있지만, ARS의 <CAO>명령을 사용합니다. 만약 사용자가 <CAH>명령을 사용하고자 하시면 이후 코딩을 다르게 작성하셔야합니다. 그리고 6번 행의 delay문은 <CAO>명령을 하달한 다음 바로 시리얼 데이터를 읽도록 해버리면 미처 데이터가 도착하기 전에 지나가버립니다. 그래서 적절한 시간만큼 기다리라고 해둔겁니다. 물론 데이터가 실제로 들어올때까지 기다리라는 조건문을 넣어둘 수도 있지만, 그러면 또한 여러가지 이유로 실제 데이터가 도착하지 않는 에러 상황이 발생했을때, 대응하는 코딩을 해야하기도 하고, 이 글은 NT-ARSv1을 아두이노에서 간편히 사용하실 분들을 위한 부분이라 그냥 단순하게 delay문으로 처리했습니다.
실제 핵심은 8번에서 11번행입니다. 아두이노는 데이터를 시리얼 통신으로 쓸때는 String 변수를 사용하는 것이 가능하지만, 받을때는 char형만 가능하므로 위 코드처럼 받은 하나의 문자를 누적해서 저장하게 됩니다. 여기서도 에러에 대한 방어는 빠져 있는데요. “>”라는 문자가 눈에 보이는 마지막문자이고, 실제로는 캐리지리턴이 같이 들어옵니다만, 여하튼 제대로 하나의 데이터가 다 들어왔는지 체크하실려면 저 부분에 “>”라는 문자가 들어왔는지를 확인할 필요가 있습니다. 또한 콤마”,”가 3개가 들어왔는지까지 카운팅하시면 에러방어대책은 충분할 것입니다만, 지금은 예제거든요^^
이제 위의 getARSresultAtOnce() 함수를 사용해서 roll값을 받는 부분을 별도로 getRollAngle()이라는 함수로 만들었습니다.
|
1 2 3 4 5 6 7 8 9 10 |
double getRollAngle() { String outputValuesOfARS = getARSresultAtOnece(); int firstComma = outputValuesOfARS.indexOf(','); String rollAngleST = outputValuesOfARS.substring(1, firstComma); double rollAngle = rollAngleST.toInt() * 0.001; return rollAngle; } |
getARSresultAtOnce()의 결과 데이터가 <roll, pitch, roll_vel, pitch_vel>의 형태로 저장되는데요. 이 결과에서 roll데이터만 추출하는 것입니다. 먼저 4번행에서 아두이노의 String 클래스에서 지원하는 indexOf()라는 함수를 이용해서 콤마(,)의 위치를 찾고, 5번행에서 substring()함수를 이용해서 roll데이터 부분만 추출합니다. 아직까지는 String 형태이므로 7번행에서 toInt()함수를 이용해서 숫자의 형태로 변환합니다. 그리고 NT-ARSv1은 내부적으로 1000이 곱해서 출력되므로, 다시 0.001로 나눠줍니다. 이렇게 하면 radian단위의 각도로 roll을 얻을 수 있습니다.
|
1 2 3 4 5 6 7 8 9 10 11 |
double getPitchAngle() { String outputValuesOfARS = getARSresultAtOnece(); int firstComma = outputValuesOfARS.indexOf(','); int secondComma = outputValuesOfARS.indexOf(',', firstComma+1); String pithchAngleST = outputValuesOfARS.substring(firstComma+1, secondComma); double pitchAngle = pithchAngleST.toInt() * 0.001; return pitchAngle; } |
그 다음은 getPitchAngle()함수로 별 설명이 없어도 알 수 있으실 테지만, 두번째 데이터인 Pitch를 추출하는 함수입니다. getRollAngle() 함수와 다른 점은 Pitch 데이터는 첫 번째 콤마(,) 부터 두번째 콤마 사이에 있는 데이터이기 때문에 4번 5번행처럼 첫째 두번째 콤마를 찾아야합니다. 그리고 나머지는 동일합니다. 이런 원리로 NT-ARSv1의 세번째 네번째 데이터인 각각의 각 속도도 추출할 수 있습니다. 이제 전체 코드를 보여드리면,
|
1 2 3 4 5 6 7 8 9 10 11 12 13 14 15 16 17 18 19 20 21 22 23 24 25 26 27 28 29 30 31 32 33 34 35 36 37 38 39 40 41 42 43 44 45 46 47 48 49 50 51 52 53 54 55 56 57 58 59 60 61 62 63 64 65 66 67 68 69 70 71 72 73 74 75 76 77 78 79 80 81 82 83 84 85 86 87 88 89 90 91 92 93 94 95 96 97 98 99 100 101 102 |
// 2013.09.16 NTRexLAB. // NT-ARSv1 example // ARDUINO MEGA ADK. ARDUINO IDE 1.0.5 void setup() { // initialize serial and serial1 communications at 115200 bps: Serial.begin(115200); Serial1.begin(115200); } void loop() { double rad2degree = 180/3.141592; double rollAngle = getRollAngle(); Serial.print(" Roll Angle is "); Serial.print(rollAngle*rad2degree); Serial.println(" degree."); double pitchAngle = getPitchAngle(); Serial.print(" Pitch Angle is "); Serial.print(pitchAngle*rad2degree); Serial.println(" degree."); double rollAngVel = getRollAngVel(); Serial.print(" Roll Angular velocity is "); Serial.print(rollAngVel*rad2degree); Serial.println(" degree/second."); double pitchAngVel = getPitchAngVel(); Serial.print(" Pitch Angular velocity is "); Serial.print(pitchAngVel*rad2degree); Serial.println(" degree/second."); while(true); } // Getting output data of NT-ARSv1 after "<CAO"> commander. // The resulting data is stored in the form of a String. String getARSresultAtOnece() { String outputValuesOfARS = ""; Serial1.print("<CAO>"); delay(2); while (Serial1.available()) { char incomingChar = Serial1.read(); outputValuesOfARS += incomingChar; } return outputValuesOfARS; } double getRollAngle() { String outputValuesOfARS = getARSresultAtOnece(); int firstComma = outputValuesOfARS.indexOf(','); String rollAngleST = outputValuesOfARS.substring(1, firstComma); double rollAngle = rollAngleST.toInt() * 0.001; return rollAngle; } double getPitchAngle() { String outputValuesOfARS = getARSresultAtOnece(); int firstComma = outputValuesOfARS.indexOf(','); int secondComma = outputValuesOfARS.indexOf(',', firstComma+1); String pithchAngleST = outputValuesOfARS.substring(firstComma+1, secondComma); double pitchAngle = pithchAngleST.toInt() * 0.001; return pitchAngle; } double getRollAngVel() { String outputValuesOfARS = getARSresultAtOnece(); int firstComma = outputValuesOfARS.indexOf(','); int secondComma = outputValuesOfARS.indexOf(',', firstComma+1); int thirdComma = outputValuesOfARS.indexOf(',', secondComma+1); String rollAngVelST = outputValuesOfARS.substring(secondComma+1, thirdComma); double rollAngVel = rollAngVelST.toInt() * 0.001; return rollAngVel; } double getPitchAngVel() { String outputValuesOfARS = getARSresultAtOnece(); int firstComma = outputValuesOfARS.indexOf(','); int secondComma = outputValuesOfARS.indexOf(',', firstComma+1); int thirdComma = outputValuesOfARS.indexOf(',', secondComma+1); String pithchAngVelST = outputValuesOfARS.substring(thirdComma+1, outputValuesOfARS.length() - 3); double pithchAngVel = pithchAngVelST.toInt() * 0.001; return pithchAngVel; } |
38번행 이후는 위에서 쭈욱 설명드린 그대로 입니다. 다시 한번 말씀드리지만 NT-ARSv1을 아두이노에서 사용하기 위한 하나의 예제로 발생할 수 있는 에러나 예외상황에 대한 대비는 없습니다.^^.
그리고, 11번부터 36번행은 이렇게 추출된 데이터를 사용한 것일 뿐입니다. 이 예제는 [바로가기]와 같은 하드웨어적인 연결을 가지기 때문에 ADK MEGA 보드를 사용했습니다. 그래서 ARS와의 연결은 Serial1에 PC와는 Serial에 연결되어 있으며 두 통신 속도는 모두 115200으로 세팅되어 있습니다. 출력되는 각도는 함수를 설명드릴때 했지만 라디안(radian)단위이기 때문에 눈으로 쉽게 확인하게 하기위해 degree로 변환해서 보여줍니다.
이렇게 해서 시리얼 모니터로 출력하면 위 그림과 같은 결과를 얻을 수 있습니다. 이제 NT-ARSv1을 아두이노에서 핸들링하고자 하시는 분들께 하나의 예제를 보여드린듯 합니다.


